
Make Your Own Christmas Decoration!
 This is my first blog for EthicalSuperstore, so I’m jumping straight in doing my favourite thing, enjoying a little creative fling. My aim: to fashion Christmas decorations out of goods salvaged from around the office, saving them from landfill and giving them a bright new future…
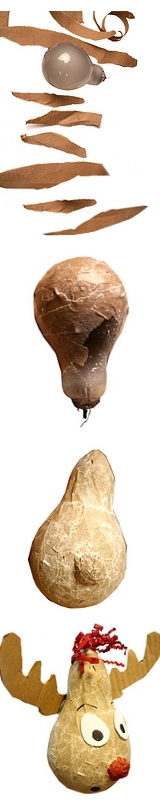
A lightbulb in one of our photography lamps blew quite spectacularly the other day, so I saved it and turned it into a reindeer in just a few easy steps. Here’s a guide so you can do the same!
My Easy Step-By-Step Guide To Make Your Very Own Lightbulb Reindeer Decoration:
- Replace your old lightbulbs with new energy saving ones.
- Taking the spent lightbulb, gather other useful leftover goods, such as:
- Brown paper (I used some of the brown paper used for packaging parcels)
- Flour (I used Doves Farm Plain Flour)
- Water
- Container
- Space
- Cardboard (I used a recycled packaging box)
- A Little Bit of White Paper
- Black and Red Pens
- Scissors
- Glue or Sellotape
- Make some papier mache paste. Add 1 part flour to 3 parts water in an old container and stir thoroughly until there are no lumps left. You may want to add a little cinnamon. This makes it smell a little more festive.
- Rip (or cut) strips of brown paper and soak for a while in the papier mache mix.
- Cover the lightbulb in the soaked paper, criss-crossing as you go until the whole lightbulb is covered. (You may find you enjoy the experience of allowing water near the lightbulb…) It’s quite tricky to get the papier mache mixture to sit smoothly on a lightbulb because of it’s shape, but keep going, it’s worth it.
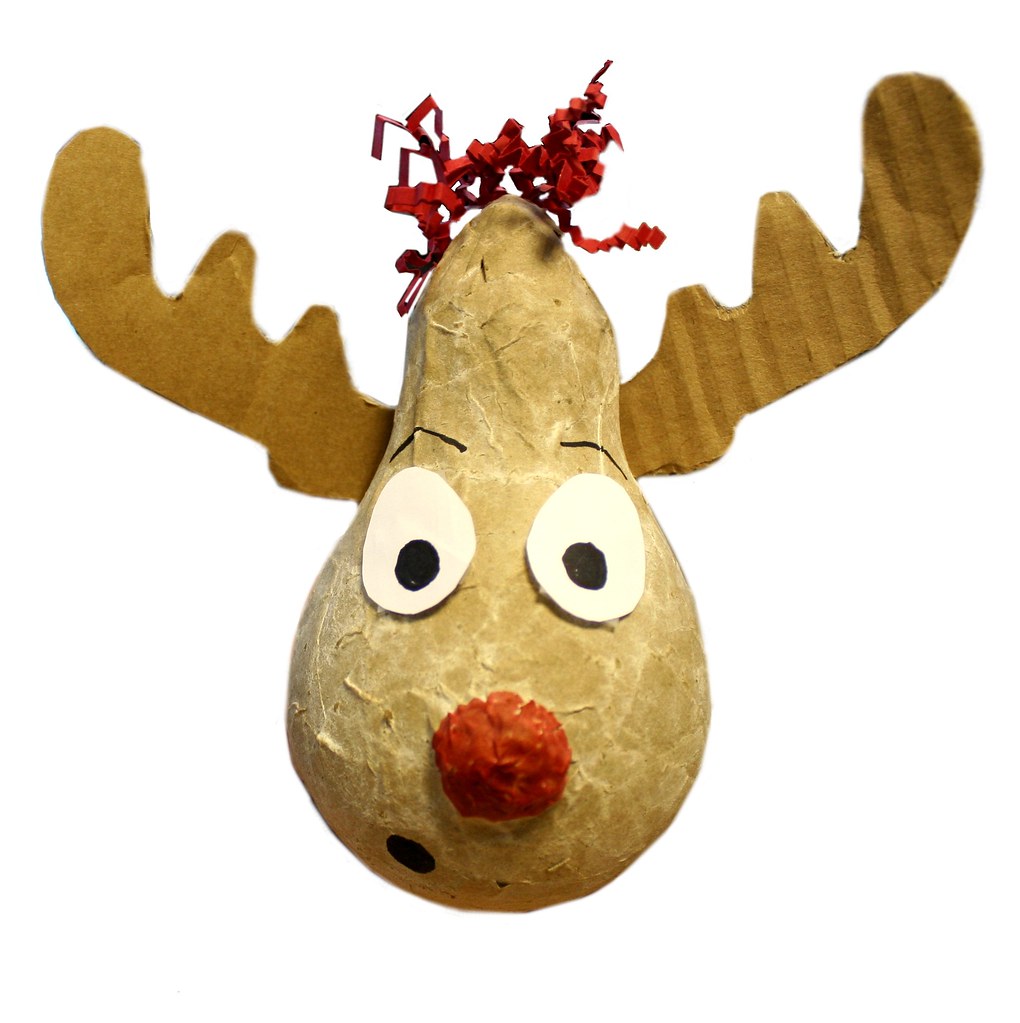
- If you like, create a nose by scrunching up some of the soaked paper, putting it on the lightbulb and covering with strips of soaked paper.
- Leave to dry thoroughly somewhere fairly warm. I found that the flour in the paste gave a “frosty” look to my reindeer, an added bonus!
- Now you’re ready to decorate! Take a moment to gather your creative thoughts.
- Sketch some antlers to make a template. Draw around it twice on cardboard and cut out two antlers. Attach them to the back of the lightbulb with sellotape or glue.
- Colour in the nose red. You have to, it’s Christmas.
- Add some eyes. Using the white paper and a black pen, draw and cut out some eyes and attach them to the half-formed reindeer.
- Add character with special features. Every reindeer is unique! Eyebrows are the most expressive feature; why not practice on paper before you draw on the decoration? I gave my reindeer a “surprised” face, with a mouth to match and red fuzzy hair made from the decorative paper we use in our Christmas Hampers.
And that’s it! Attach some wire or ribbon to your new friend and hang him (or her) in a place where all may admire.
We would love to see a whole herd of Recycled-Reindeers this Christmas, so why not send us a picture of your own creation? Or if you have any other festive craft ideas, please share them by leaving a reply!


Looks excellent – I’ve always avoided paper mache stuff cos I really hate the smell, but your cinnamon suggestion is really fab!
What a great little chap. I’d put him on my tree any day!